Author: sparksight_admin
3 Keys to the Perfect Pair of LinkedIn Photos
With a wide variety of social media platforms out there, proper “netiquette” can be hard to pin down for each individual site. The high-frequency, opinionated posts that characterize Twitter would look out of place on Facebook. Moreover, the disappearing photos shared on Snapchat hardly ever end up on Instagram channels. Similarly, the profile pic and cover photos that people use on most social media profiles aren’t typically appropriate for LinkedIn. In your LinkedIn photos, you want to convey professionalism, while still maintaining some level of personality to set you apart from the crowd. We’ve outlined below some considerations to make before your next photo upload.
The Importance of LinkedIn Photos
Perhaps the most common mistake users make when building a LinkedIn profile is to not include pictures at all. While it’s technically better to post a poor-quality picture than nothing at all, neither case is optimal. LinkedIn heavily favors profiles that are complete, so if your profile doesn’t feature a profile and cover photo, doesn’t include your current occupation, or omits your education, then you’re less likely to show up on a LinkedIn search. This, in turn, means that you could be far less likely to find when the recruiter hiring for your dream job is looking for eligible candidates.
Moreover, LinkedIn is perhaps the least anonymous of the popular social media platforms. You may have noticed that you get a notification when someone views your profile. The platform records not only the number of “likes” on your posts, but also the number of views the article in your share gets. To take it further, a user with a LinkedIn Premium profile can view the profiles of whoever views her shared posts, and she receives the name of every user who skims their profile. This means that when you research that executive to plan your sales pitch, they see your profile as well. If your profile photo is missing or of poor quality, you’ll be putting yourself at a disadvantage.
Ultimately, preparing a top-notch LinkedIn profile requires an investment of time, and perhaps even a little bit of money, to get a high-quality set of LinkedIn photos that will give other users a positive impression of your personal brand and professionalism.
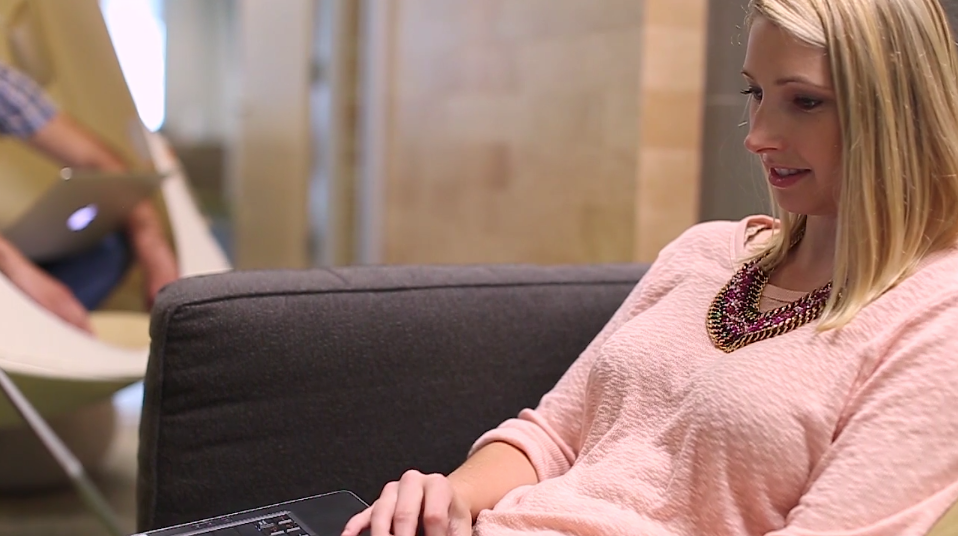
The Profile Picture
To put it simply, your profile picture should be taken by a professional photographer. As a rule of thumb, your profile picture should be shoulders-up. Ultimately, what matters to viewers of your profile photo is what you look like, so that they may be able to identify you in person. Moreover, it’s a well-documented fact that facial expressions are integral to in-person conversation, and there is evidence to the fact that people engage more with online content when it features a human face. A trained photographer will be able to properly frame the photo and ensure that all aspects of the photo are top quality.
On the other hand, you must also pay attention to what else is – or isn’t – in your profile photo. You should be dressed in your LinkedIn profile photo just as you do on a typical day of work. As such, the rules are different for professionals in different fields and locations. Where a graphic designer in Austin, Texas would perhaps look out of place entering the office wearing anything beyond jeans and a T-shirt, a banker in Manhattan would be reprimanded for anything less than a full suit and tie.
Finally, the background of your photo should be a solid color like white or gray. The goal of your profile photo is to feature your face. While you may have some amazing shots in front of a stunning background, your LinkedIn photos are not the right place to feature these photos.
The Cover Photo
This is where you get the chance to show a little bit of personality. Your profile photo should feature your face, a plain background, and nothing below the shoulders. Your cover photo should, in turn, have no human faces at all. However, the photo should be tailored to your professional career. If you’re an REI employee, a landscape is perfect. On the other hand, a dynamic shot of server racks can add the appropriate color to an information systems administrator’s LinkedIn profile. Across the board, cityscapes are popular cover photos.
While there is far more flexibility in your LinkedIn cover photo than in your profile photo, you should still avoid treating it like a Facebook photo. Avoid pictures of yourself in small groups. The framing on the site doesn’t work well with this style of photo. Additionally, avoid using your company’s graphics. Your profile should make it clear enough where you work. Your LinkedIn photos are about you as an individual, not your company.
What turns your head when it comes to LinkedIn photos? Share your thoughts in the comments section below!
related posts


Common Photo Shoot Mistakes and How to Avoid Them
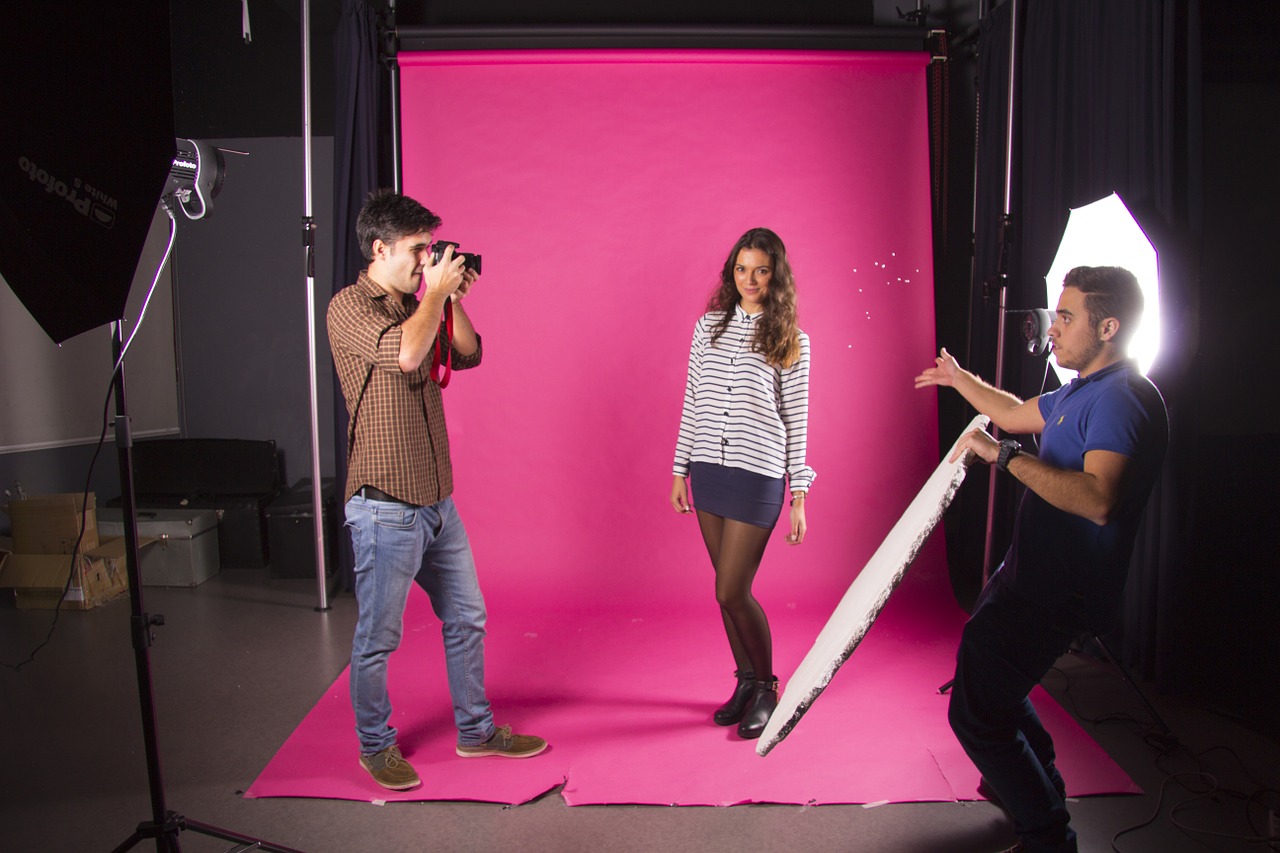
Any professional photographer will tell you that the most difficult part of a photo shoot isn’t the camerawork, the lighting, or the setup. Rather, the biggest responsibilities for the photographers are– surprisingly– coordinating with the client. A photographer never wants to disappoint a client, and meeting all the requests and expectations can be a lot to juggle. The best way to mitigate any confusion between the photography team and the client is to have a conversation in advance to make sure your photo shoot goes off without a hitch. Doing so makes it easier to trust your photography team, and avoids unnecessary miscommunication. To help you perfect your next photo shoot, we’ve compiled a list of a few common photo shoot mistakes and how you can avoid them.
Failing to Scout a Location
The right location for your photo shoot, whether it be for a headshot or a group picture, is essential. It can be difficult to identify a place with a decent amount of lighting, an appealing background, and room to focus on the subject. It’s also important to keep in mind how private of an area the location is, as busy activity or frequent passerby are sure to ruin an effective photo shoot. When working with an agency for the first time on a new photo project, it’s often beneficial to invite them to a location scout. At the very least, be sure to tell your photographers the type of location you have chosen so they can best facilitate your pictures. Aesthetic qualities– such as whether the location is indoor or outdoor, well-lit or shaded, colorful or more muted– should all be mentioned to avoid any photo shoot mistakes. This way, your photographers will know exactly how best to prepare for your optimal location– and preventing this common photo shoot mistake makes the process easier for them, too!
Not Being Dressed for the Occasion
One of the most common photo shoot mistakes is for the subject to arrive underdressed or disheveled. Often, the reason is simply that the subject forgot the shoot was that day and left home in the wrong outfit. Even if a shoot is happening in your own office, be sure to send your calendar reminder the day before to make sure everyone arrives at work with the appropriate attire on the day of the shoot. Over or under-applying makeup also affects the final picture quality. Even men’s pictures can dramatically benefit from light, properly applied makeup. If you don’t know what’s right for your photo shoot, ask your photographers. Chances are, they’ve done a hundred shoots just like yours, and may be able to recommend certain clothes, bring a makeup artist, or give you other helpful pointers about how to arrive.
Not Knowing What You Want
Of all the common photo shoot mistakes, clients that don’t know what they want are the most taxing on photographers. The ideal situation is to have a photo shoot be a regular, routine exercise. However, if an upcoming photoshoot is outside the usual, it’s important to know what you’re looking for and communicate your expectations in advance. If you want the background out of focus, convey that to the photographers well before the shoot. You don’t want to wait for the photographers to suggest an idea for your pictures and end up not knowing what they’re doing. More importantly, you don’t want to end up hating the final takes! An experienced professional will have done all kinds of shoots and will be able to make dependable suggestions to make the most of your shoot.
Failing to Have Fun
Believe it or not, failing to have fun is one of the most important photo shoot mistakes you can make. Unless you’re Emma Watson or Brad Pitt, chances are getting your picture taken isn’t something that happens every day. This means that you may be uncomfortable in front of the camera or awkward being the center of attention. Fight these feelings! Your photographer is there to worry about making sure the photo comes out just how you want, and your job is to enjoy it. Having fun in your shoot has the added bonus of making you look relaxed, happy, and confident in the photo. Any discomfort you have will be amplified in the photo, and it’s very hard to use Photoshop to fix an awkward picture. So… Relax! Having your picture taken should be a fun experience that captures how great of a person you are!
Any photo shoot mistakes you’ve made or seen that were particularly troublesome? Share here and help others avoid them! We promise not to judge.
related posts
SXSW Recap: Sony’s “The WOW Factory” – Part 2
Sony’s Innovation Laboratory; The Wow Factory – Continued
If you didn’t get the chance to visit the amazing event that Sony hosted this year at SXSW, I am happy to have the chance to fill you in on all the cool technology they featured at their event in the Wow Factory here in Austin, TX.
The wow factory really was the perfect name and 99 Trinity really was the perfect venue. For those less familiar with the area, there has always has been an abandoned warehouse there and more than a few people asked me “why are you going in there? there’s nothing in there!” to everyone’s surprise that was the farthest thing from the truth. The Sony team entered the abandoned space and within a week turned it into a tech wonderland. See how they did it with this time lapse!
Below I will recap the remaining exhibits from “The WOW Factory,” you can find the rest in Part 1!
“Superception”
With the tagline “PLAY THE NEW HUMAN PERCEPTION” I wasn’t sure exactly what I was getting myself into…
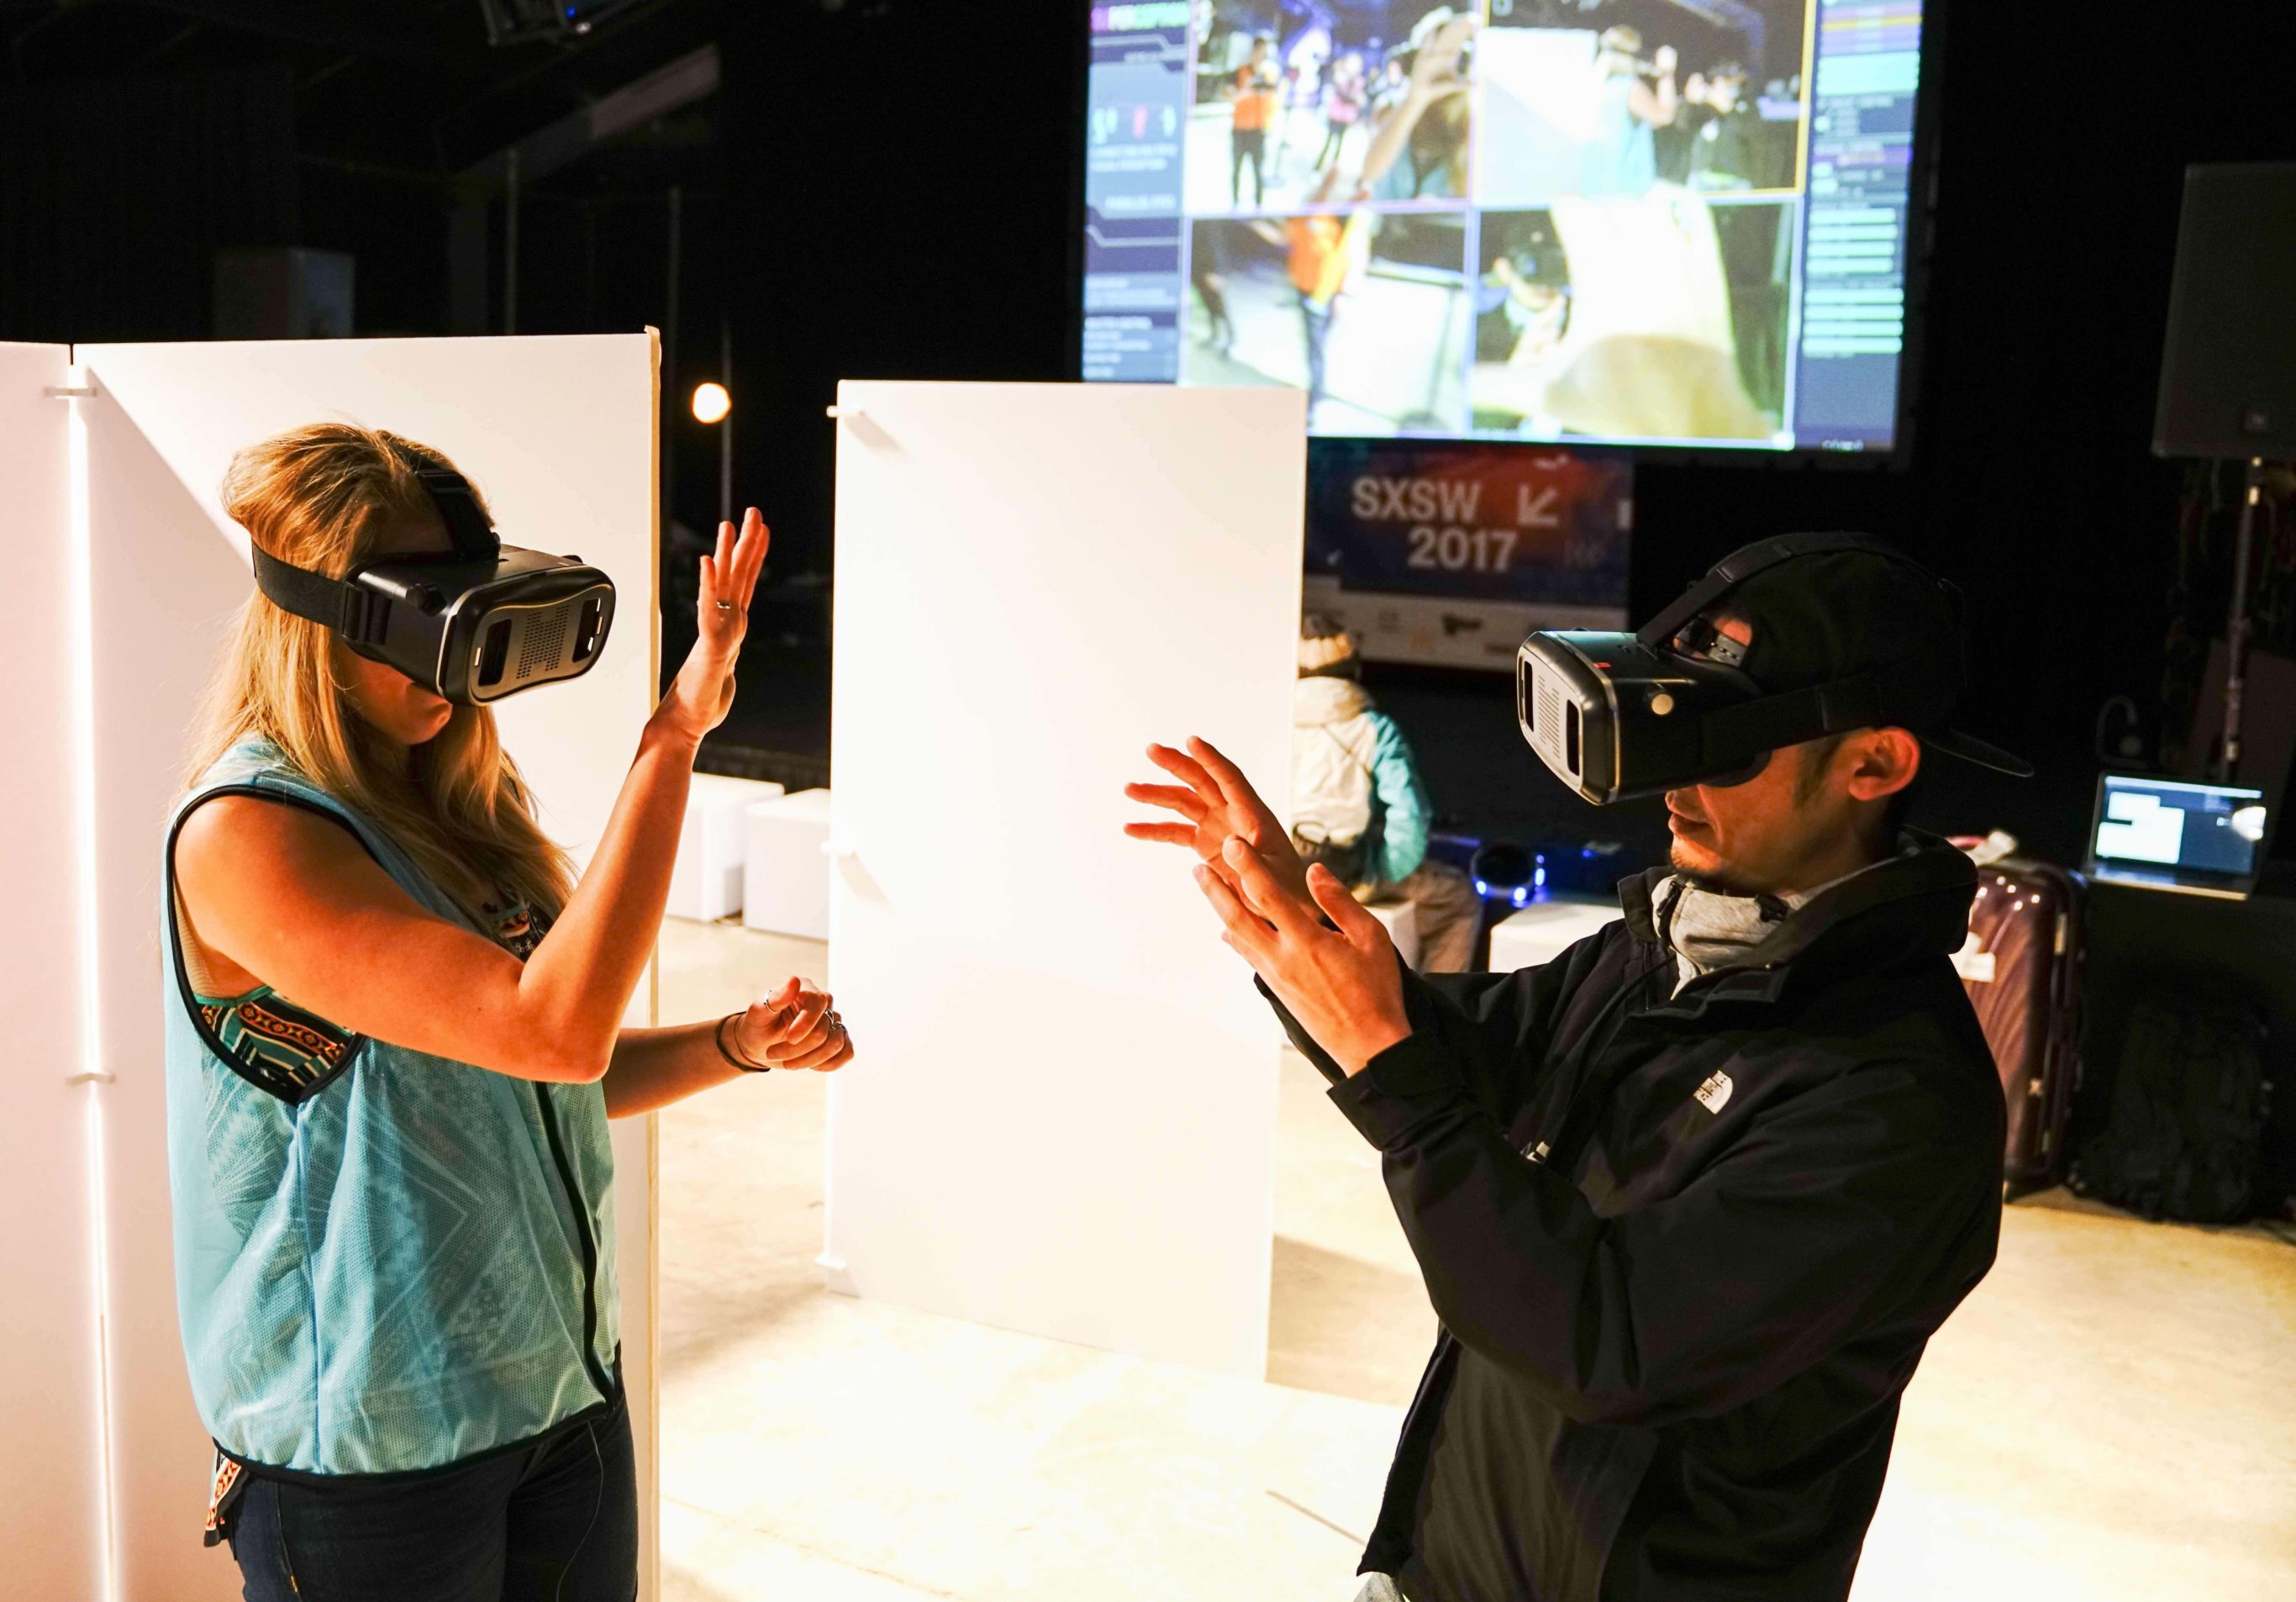
As dumb as I look in this picture, I bet you’d do the same! Superception is 4D. Yes, four dimensions. Confused? Me too, still am. You can see yourself through everyone else’s eyes, which at first is wildly confusing! I could barely understand where I was in space when they asked us to play tag in a maze! Turns out the longer you wear the headset the more you start to understand.. its quite Erie, but definitely an experience I wouldn’t want to miss.
Xperia Open Style Products
In this station there were two products on display: an open ear style earbud and “make your own music” table. If you’ve ever tried to talk to someone with earbuds in at work then you know why they’re creating this…
https://youtu.be/CyZ8x3advvU
The Xperia music project was extremely fun to play around with – basically you can either swipe to draw a piano, or draw a series of different sized circles to generate different types of drums. Depending on how you drew your instruments, they each created different sounds. It was really incredible to create playable instruments with the touch of your hand! You can add any music you like along with lights to accompany the sounds you make. The crazy thing is when you walk away from the table, it all disappears, just like that.

Motion Sonic Project
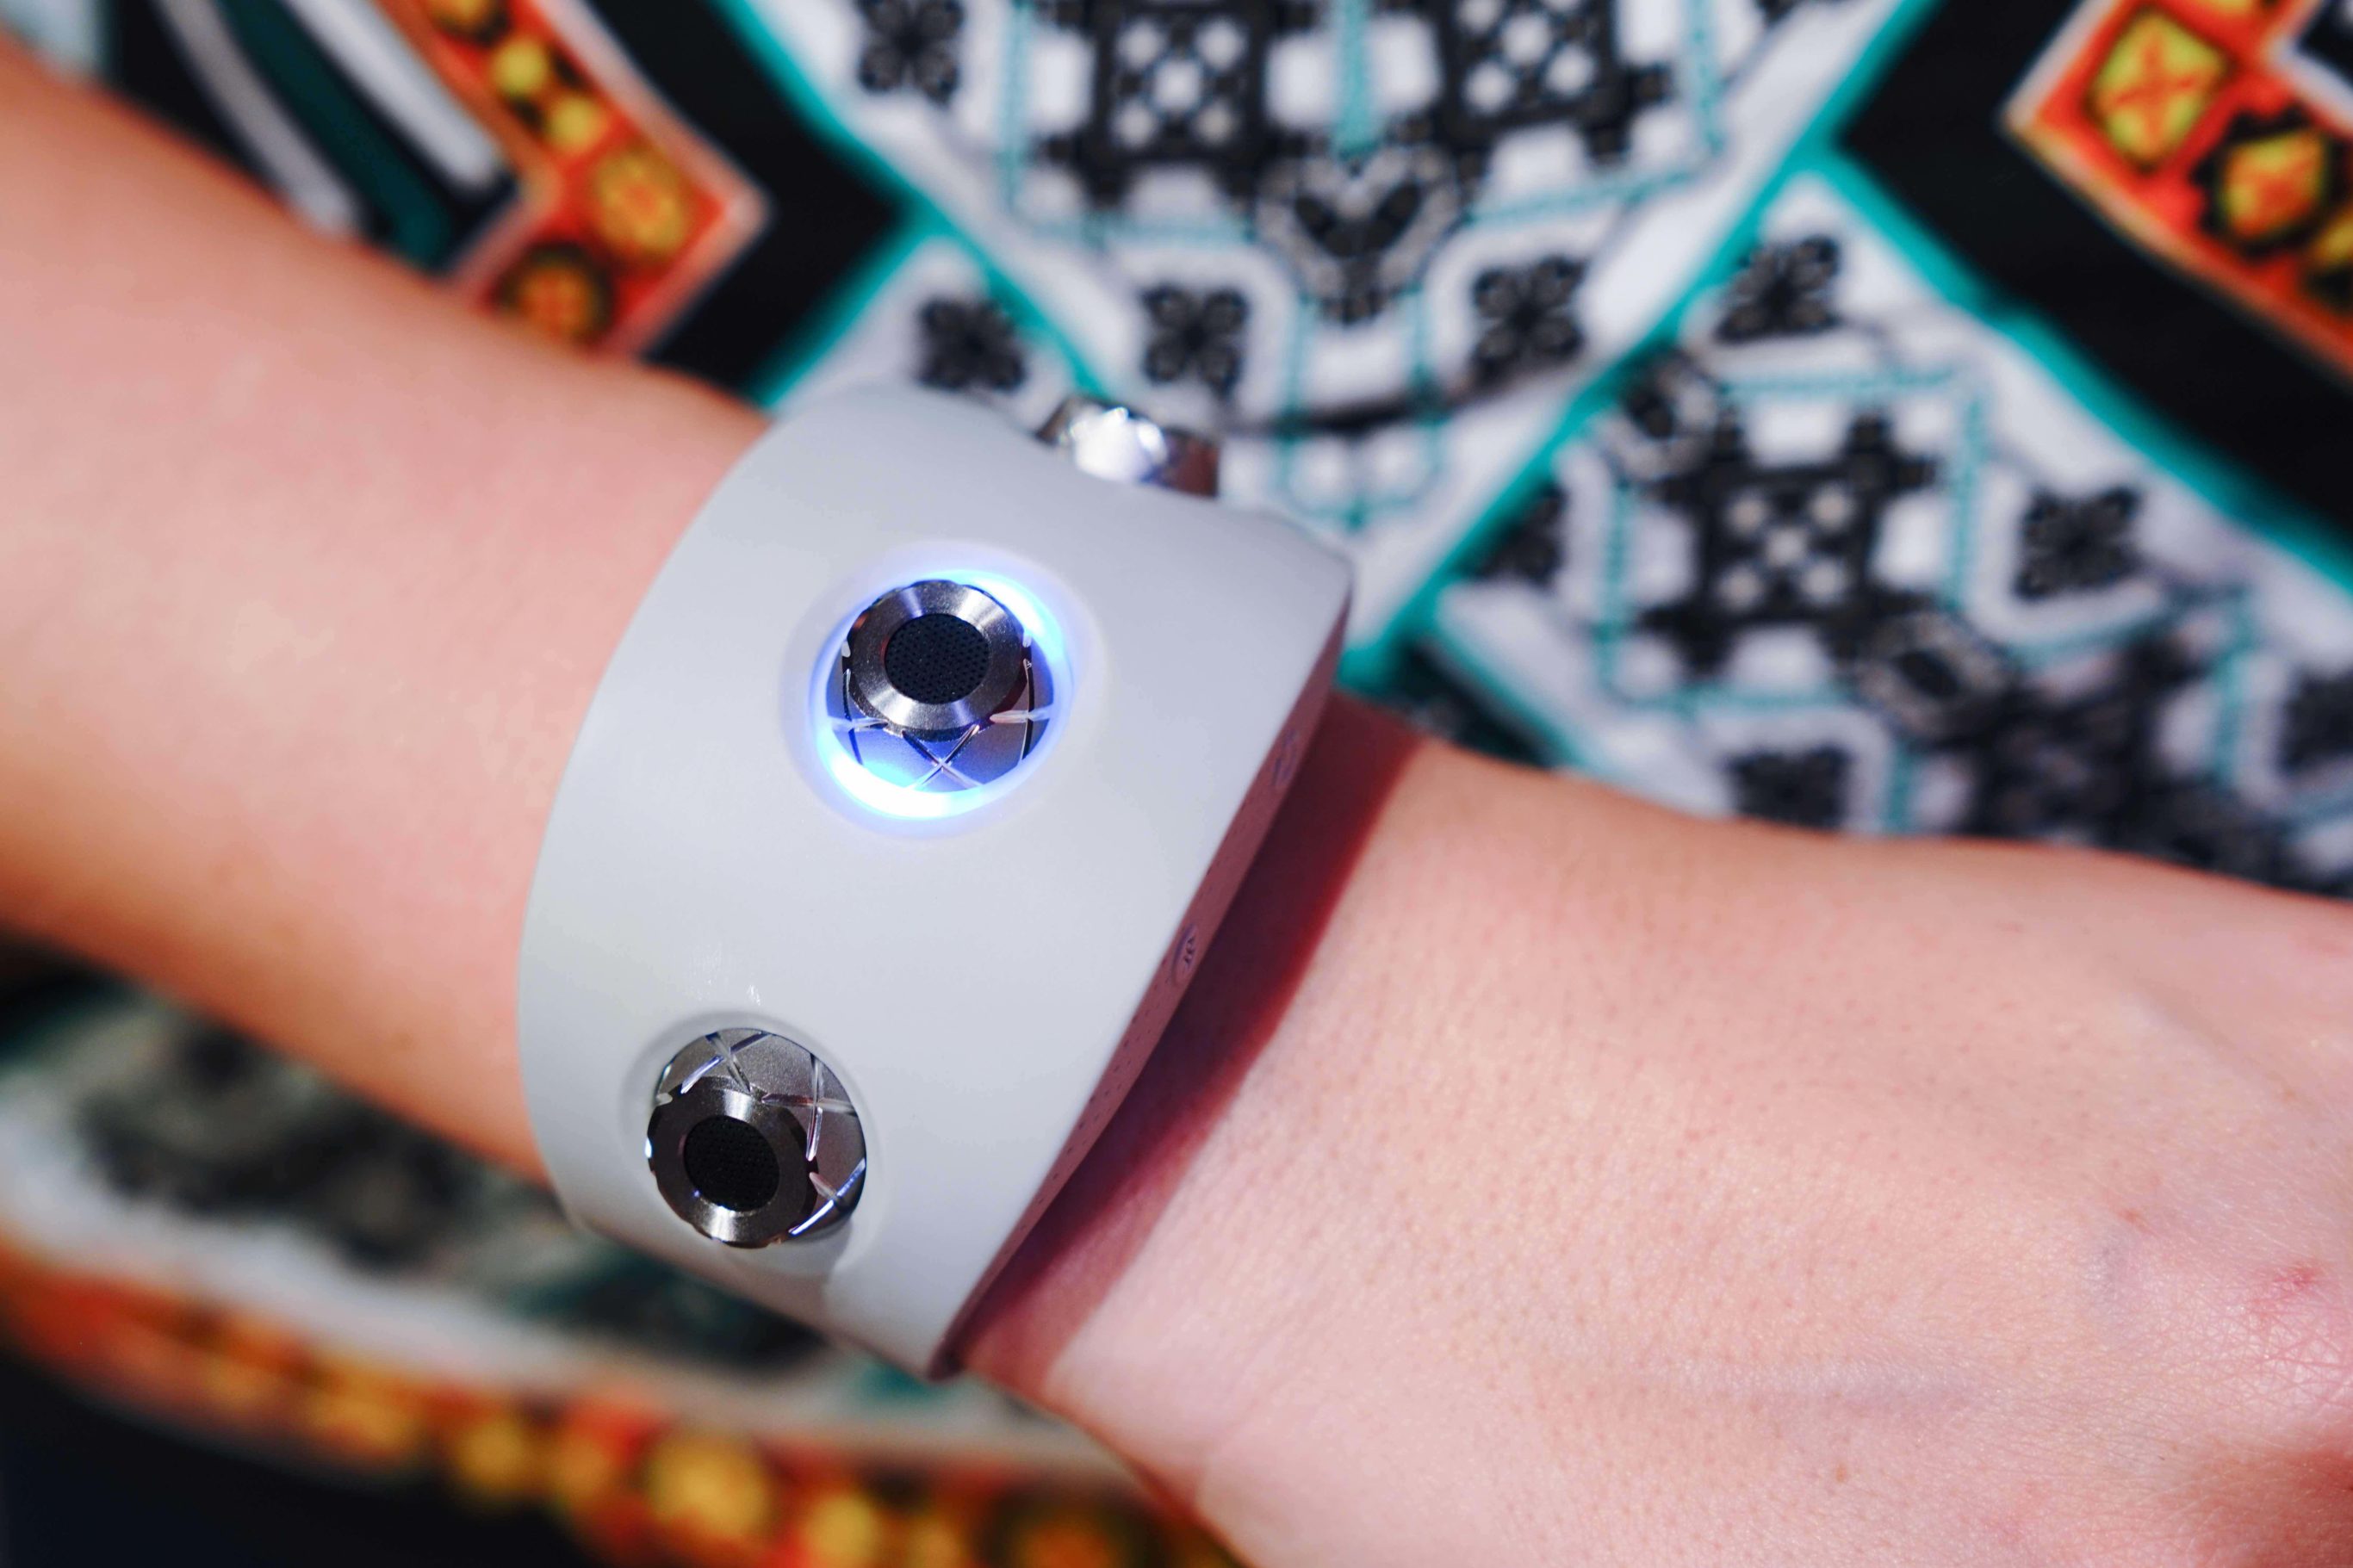
The station in which they really showed me up was the sound project. I tried on this crazy bracelet and made some sounds that were cool.. but then they brought out an award winning karate black belt, to say the least the sounds I made did not compare.
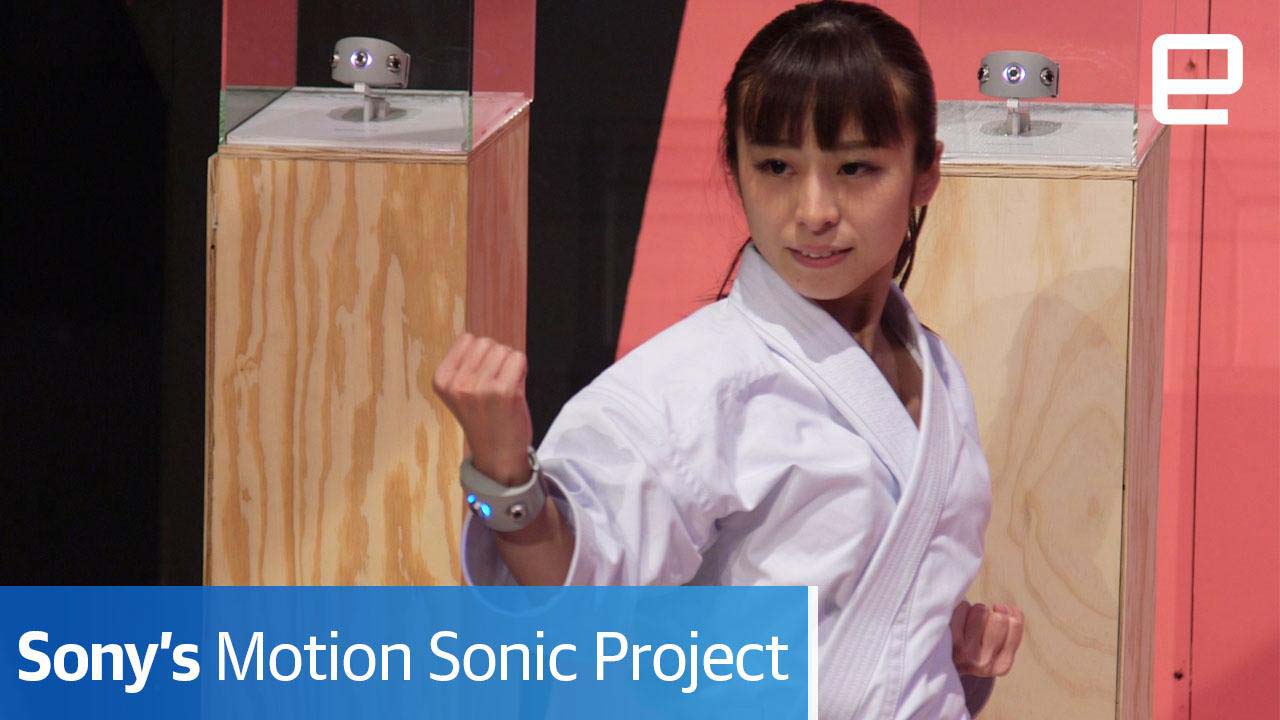
Sony also had a dancer demonstrate and they both made very beautiful, very different sounds. The music and motion was so fluid it was incredible to witness. Check out some of their demonstrations here.
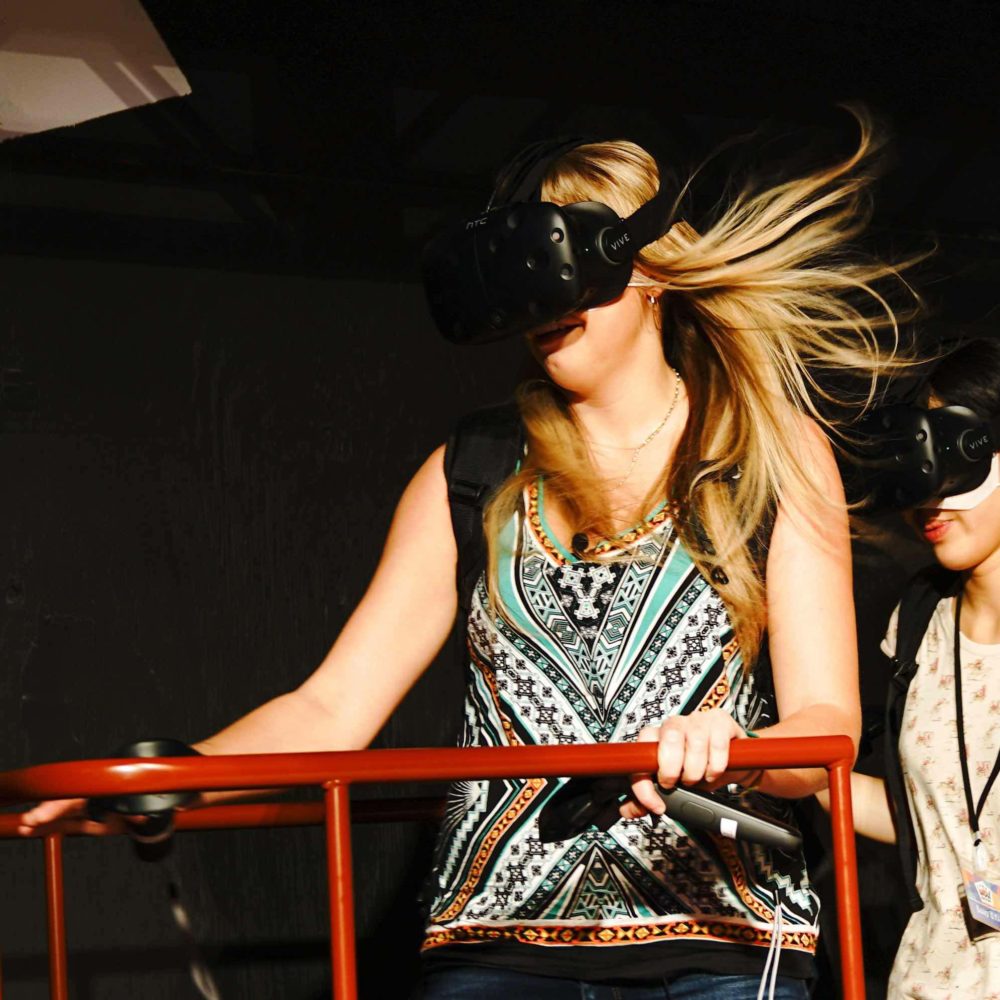
Gold Rush VR
The second VR game I played was one where multiple others joined me in competition to get the most gold in “gold rush” In the game you can see yourself, or rather your avatar, from your own perspective and move and interact with others within the VR zone (check out a quick clip here). To pick up gold you squeeze a trigger button to activate the vacuums that are in your virtual hands. You can pick up objects and throw them in order to knock objects over exposing more gold. You can also throw objects at each other, which my teammates and I did quite a lot.

There were three separate “rooms” within the game, all of which you travel to by boarding the trolly. Though it may have appeared silly on the outside, and cognitively you know the wind in your hair is an obvious fan right in front of you, it feels real. You board the trolly and though you know you are still in the same space, all your senses tell you otherwise. My grip on the trolly was one with white knuckles and I couldn’t get myself to relax! We flew through tunnels of gold mines and went way too fast for comfort.

Resident Evil Interaction Technology
As I was a little wobbly from the gold rush experience, I am glad they saved the interactive “Road to Raccoon City” for last as I doubt I would have put another VR set on my head after that. This game(see it here!) is inspired by the movie “Resident Evil: The Final Chapter” and is set up with the player defending against impeding zombies. The technology includes 3D sound technology that really gets in your head.. I really did not like it at least in this context!
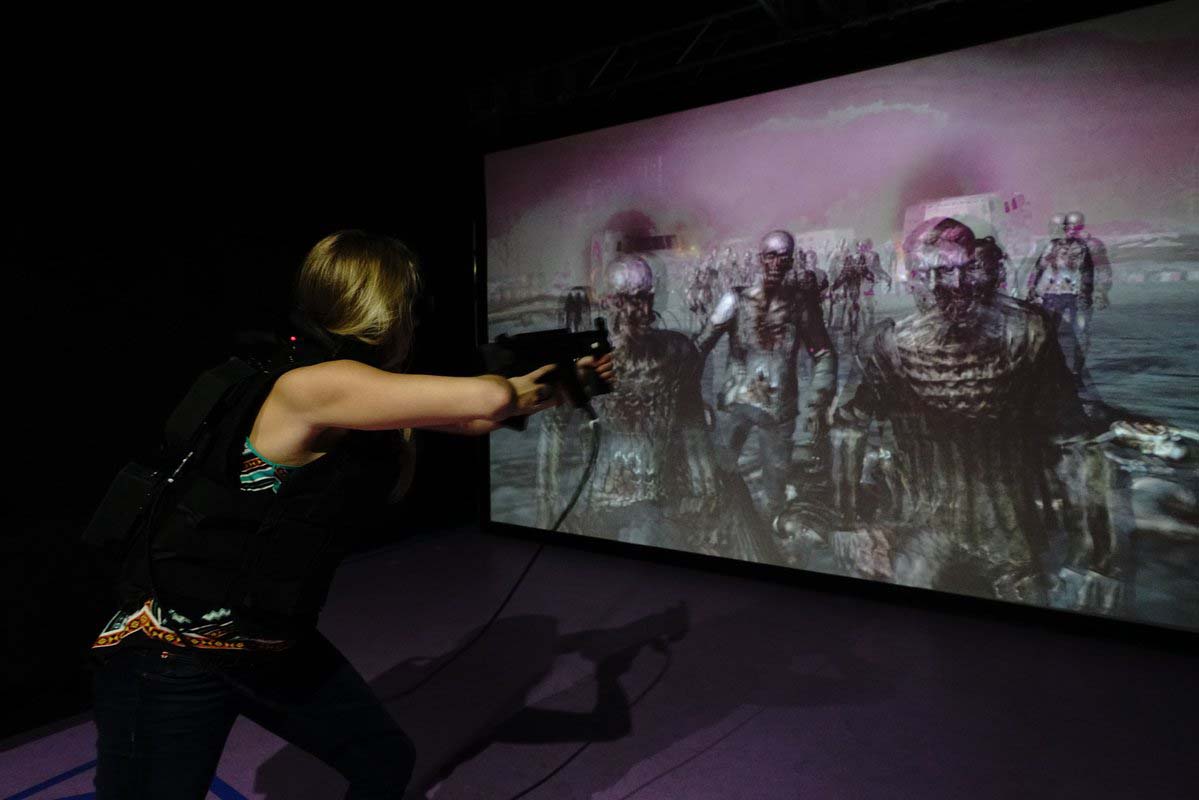
The game also featured a specialized VR headset along with a vibrating vest that they strap you into. As the zombies attack or bombs go off your vest actually shakes you and sends vibrations to specific trigger points in your body. My heart was racing and I was genuinely scared! I personally feel like my fear was justified because initially as we were shooting video, the camera lights were in the way of my lazer which deflected my shots.. and those zombies were aggressive!! Even after we corrected my gun situation, I still was flinching as I FELT zombies taking bites out of my arm and then a zombie dog run up and attack me! I watched and felt the dog rip out my guts! Call me a baby but I seriously did not want to play again by the end of it, it was that realistic!
In all I was blown away by the imagination and innovation Sony brought to the Wow Factory. I think I may have been one of very few people to get to try ALL of the inventions because the lines were so long it would’ve taken days! None of the products I’ve reviewed here have actually hit production, but I really cannot wait until they do. As if all of the amazing technology wasn’t enough, they even had complimentary sushi! Big thanks to the Sony team, see original photos here.
If you got to experience the Sony Wow Factory, share your opinions and favorite exhibits below!

5 Keys to a Killer Customer Testimonial Video
No matter your target customer, a strong endorsement from a satisfied customer will give you a powerful tool to win over your audience. No matter how great your sales team is, nothing can beat the credibility of an outsider offering their positive experience with your product. But just as with any powerful marketing tool, a customer testimonial video is only effective when created and leveraged properly. To help you out, we’ve put together a few key bases to cover in order to optimize your next customer testimonial video.
Authenticity
Even through a screen, humans have an uncanny ability to sense when someone is not giving them the straight goods. It’s important to make sure that your customer is covering your key points, but your video loses any benefit whatsoever as soon as they misrepresent their experience with your company. For this reason, you want to be sure that you either use more than just one customer or that you work with one who has been partnered with you for a long time, and has had positive experiences with every aspect that you hope to cover in your testimonial video. In the end, the easiest way to ruin your customer testimonial video – and throw away everything you’ve invested in it – is to misrepresent yourself or your customers.
Another facet of authenticity is to use your real customers. Though it may sound appealing to use an actor to convey the same message, it isn’t authentic. Ultimately the best way to prepare your testimonial video is for people to deliver their own authentic opinions and experiences.
Preparation
Though it may sound a bit contradictory to the section on authenticity, it is also important to prepare your customer with the questions that they will be asked. This doesn’t need to be days in advance, but perhaps just some time to read over the questions, for clarification. Furthermore, you want to be sure that their statements completely cover the points that you want to convey in the finished testimonial video. Remember that the questions that you ask to the on-screen talent will not be included in the final product, so any topics they don’t directly speak about will not come up at all in your video.
Note that this does not mean that you should furnish your customer with a script. For clarification, see the section on authenticity.
Compelling Visuals
The customer testimonial video poses a particular challenge to your videographer, who must strike a healthy balance between revealing the authenticity behind the customer’s testimonial by showing her face, and compelling b-roll footage. Though it is true that human faces have a strong psychological draw on humans, there’s a reason that news channels try to cut between images of talking heads and more dynamic video shots. Combining the primary footage of your customer’s testimony with an appropriate amount of relevant, engaging, and dynamic secondary footage will help to keep your audience engaged and interested in hearing about your customer’s positive experience with your products.
Results
As much as possible, encourage your customer to talk about their business and how they’ve achieved success with your product. Specificity with regards to growth in revenue, costs, profits, leads, or any other metric will help you by throwing some weight behind your value proposition and convince potential customers that your product will in fact help them to accomplish their goals. Of course, this can be challenging because customers could be apprehensive of disclosing vital information in your customer testimonial video, so it is also important to work with them and your script writer in order to ensure that all parties get the most out of the project.
Consistency
You can help bolster the effect of your customer testimonial video by ensuring consistency in your video content. Ultimately, the only thing that can top the testimonial of one satisfied customer is the positive endorsement of more than one person who’s had a positive experience with your products. As such, most companies choose to create more than one testimonial video to leverage the positive experiences of other satisfied customers. When creating the second, third, and further customer testimonial videos, you want to ensure that the main points covered in your video remain consistent throughout. If one of your greatest strengths is something as broad as your talented and friendly customer service team, then this should come up in all of your customer testimonial videos. If not, a potential customer could recognize this discrepancy and start to wonder why only some of your previous customers were so happy with it.
Furthermore, no company is capable of doing and being everything. You, as a savvy marketer, know this, and so does your audience. As such, it is important that you’re careful to stick to what your company is actually good at. You should avoid claiming to be something that you’re not. So should your customer in your customer testimonial video.
What has driven success in your customer testimonial video? Share your experience in the comments below!

How to Prepare for a Portrait Shoot
Photography is the art of producing meaningful images one snapshot at a time. With considerable amounts of labor necessary for producing a successful portrait shoot, knowing how to prepare for one can save time, energy and money. Bright lights, inconvenient posing, and ample smiles: a photo shoot can be just that. But with the right steps, both the photographer and client can expect to walk away with quality photos. Follow these steps to ensure the most out of your session.
Confirm Your Shoot
So you’ve booked a portrait shoot! What next? Your photographer should call to confirm the session’s date, time, and location. As the client, now is the time to ask any last minute questions or express any worries. Remember, you hired the photographer because they are the expert in this field. Feel free to be honest about any concerns, as their goal is to provide a memorable shoot along with a variety of pictures. Utilize weather sites and applications, and be aware of potential weather changes in the forecast. Additionally, designate a backup location or future date in the event of necessary rescheduling.
Location, Location, Location
Location is the most important aspect of your portrait shoot. This will determine the overall theme of the shoot, what you should wear and the appropriate materials for the setting. Be aware of certain locations, both outdoor and indoor, that suit a variety of tastes and themes. Places such as nature reserves, state parks, or downtown locations will typically be free of charge but are open to the public, so be cautious of photobombers. Additionally, other venues hold service fees for using their landscaped areas or rooms, so feel free to discuss those options with your photographer. Studios are ideal for most professional photography shoots, as the controlled temperature and lighting ensures for a optimal session. Once your location is selected, do a walk through during the same time of day as your shoot. Be creative with nooks and crannies you find, and note the more attractive areas with evenly-lit backgrounds. Familiarity with the location is key for shoot success.
Make a Checklist
Preparing a checklist is key prior to any photoshoot. Include items you own as well as specific ones you may need to purchase in advance. As you roundup the materials listed, make note of unexpected changes that can occur. Remember Murphy’s Law: anything that can happen, will happen! Toiletries such as deodorant, tissues, bandaids, and water will always come in handy no matter the location, time of day, or person. More specifically, based on your location, humidity, insects, or any other outside element may inhibit your shoot success. List bug spray, sunscreen, and any other supplies that might enable the control of the setting. If there exists a slight chance of needing an item, note it and pack it.
Wardrobe
Assemble your outfits as soon as possible. Aim for clothing that allows for both comfort and confidence. Once you know which pieces work well together, set aside an additional outfit for the purposes of wardrobe malfunction or simply a different look. Booked a professional headshot session? Gather pieces typically worn to business meetings or conferences, and stray away from distracting jewelry. Hosting a casual company photo? Coordinate with coworkers in the office to decide on a specific color being worn or the theme of the picture. Consider shoe type and wardrobe color based on the location and time of year. For shoots booked during warmer times at outdoor locations, consider white and pastels to avoid perspiration issues. Portrait shoots occurring throughout fall and winter seasons should be accompanied with clothing that provides more protection from the elements. Plan accordingly.
Props and Inspiration
Have any special props you would like to include? Signs, books, chalkboards, balloons, couches, baskets, chairs or any other item you wish to be photographed has the potential to truly add to the photograph. Not only will they deliver uniqueness according to your personal style, but the props will provide a more authentic feel. Planning a theme for the portrait shoot? Select items that coincide with it! Brainstorm ideas of props you feel would best capture the essence of the session. Bringing along props aids in the creative process of both you and the photographer. Social Media websites like Tumblr and Pinterest are the perfect for generating the perfect inspiration for your photography session! If you choose to select a theme, use search engines on these sites to help filter through. The key is to make the idea into your own. Incorporate hobbies, memories, your job, or anything that contributes to how you envision the picture.
Preparation ensues confidence both behind and in front of the camera. Keep these tips in mind when considering booking your next portrait shoot!
Have any tips of your own? Share in the comments below!
related posts
How to Get the Most Out of Your Photo or Video Studio Rental
Renting a studio for a video or photography shoot can be a little bit of an ordeal. With so much time, money, and hard work being put forth to create a video or photo, it’s important to figure out how to get the most out of a video studio rental. Follow this list to get the best value during your next studio rental.
Know the studio
Studio specs should be available prior to or when booking the video studio rental. The first thing to be done when renting studio space is to become familiar with the specifics of the studio. Here is a short checklist to make it a little easier:
- What are the dimensions of the studio? These dimensions will give an idea of what can fit inside the studio. To go even further, if you’re filming something large like a car or boat, make sure the studio has a way to load those items in and out.
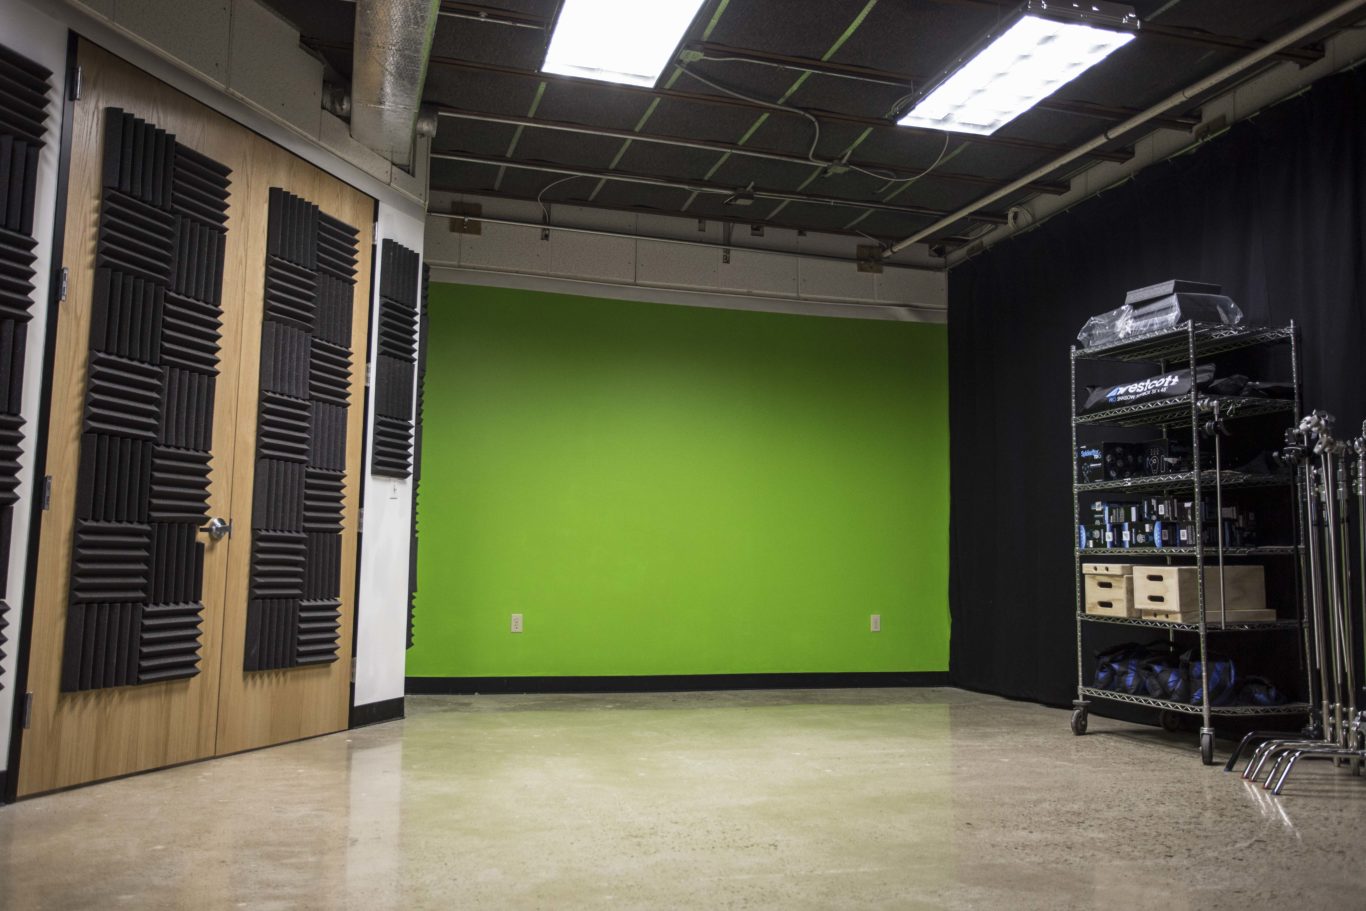
- Is there a green screen? As surprising as it is, some studios don’t have a green screen so if you need to shoot with one, make sure to ask before booking a video studio rental.
- Is there a cyc wall? This will give a seamless backdrop effect, similar to Apple commercials.
- Can you bring in outside equipment/crew? Some studios will only allow use of their equipment/crew (which they conveniently rent out, of course). Be sure to clarify to avoid any confusion or equipment mishaps.
- What camera equipment will be provided (if any)? You might be able to use the studio’s camera equipment but it will most likely be an extra charge. The benefit of this is that the studio most likely has top notch camera equipment, the downfall is that it might cost you quite a bit more.
- What lighting equipment will be provided? Most studios will have lighting equipment available as part of the rental but it might be limited. Make sure to ask if they have additional lighting equipment available for purchase or be sure to have access to your own.
- Is sound equipment provided? This is extremely important especially if you’re filming a video.
- How soundproof is the studio? Depending on the structure and how the studio was built, it may or may not be up to the sound standards you require.
- Are there any props or sets available? Whether it’s as simple as a chair or as detailed as a talk show set, it’s important to know if you’ll have these items available at the studio or if you need to bring them in. If the studio has props/sets to use, you could save a lot of pre-production time by asking the studio if you can use/rent them.
- Is a teleprompter available? This is SO important, especially if the on-screen talent is an employee, not a professional actor.
Being able to answer these questions is a very important first step when preparing for a studio shoot. In fact, most of these questions should be asked when reviewing and selecting the studio.
Complete pre-production before the shoot
There are a lot of moving parts when it comes to pre-production of a video or photo shoot. When booking a video studio rental, be sure these items are all done before the day of the shoot. Here are some of the most common items handled in pre-production:
- Casting
- Location scouting – Good news! If you’re renting a studio, this one is already done.
- Art direction
- Call times and shoot schedules
- Scriptwriting
- Storyboards/shot list
- Craft services
Art direction and scriptwriting are the two that can hold things up the most during a studio shoot. Be sure to account for any and all possibilities in terms of art direction. For example, say you’re filming a video about eyeglasses, be sure to bring plenty of options to the shoot and also try to find eyeglasses that have anti-glare lenses. Simple things like this are often overlooked and can cause problems when it comes time to shoot in a studio. Similarly, not having a final/locked script is a sure-fire way to cause delays during a studio shoot. Make sure to get approval for the script from all key stakeholders before the day of the shoot. Sometimes this is easier said than done so, if you have variations of certain lines in the script, have those lines prepared for the actors instead of creating new ones on the fly. Also, be sure to have plenty of copies of the script on-hand during the shoot. We’ve found it’s helpful to have one crew member present while shooting to make sure the script is read exactly as it is written.
Scheduling and craft services can also cause problems if you don’t put enough detail into them. For example, some actors might have very short roles while others will be on set most of the day. Instead of making one general call time for actors/talent, make the call times specific to their roles. Especially if they’re being paid hourly, there’s no need to pay someone to just hang out on set all day. Also, if actors need to go through hair and makeup, be sure to check with the makeup/hair artist to see how long they’ll need on each person to account for that on call times. Craft services (snacks, lunch, etc.) is something that can have a big effect on a studio shoot. Get a variety of snacks. We like to get a mixture that would work for everyone – something salty, something sweet, something healthy, and maybe some meat. It’s a good rule of thumb… and it rhymes. Don’t forget about lunch either, especially for full-day shoots. If actors will be present before and after the lunch break, be sure to provide them with lunch as well. Lunch isn’t always very long, especially if you’re paying for a studio rental at the same time so things that are easy to eat (sandwiches are great) are best.
Get the most deliverables possible
A video studio rental is a great place for creating video blogs, demos, or short commercial-like videos. In order to reduce studio rental time and crew costs, make sure to shoot as many videos as possible in the time available. Some ways to do this include:
- Bringing backup scripts – you could have an actor that knocks it out of the park on the first take. There’s no need to let the studio, crew, and all of the hard work you put into setting up the shoot go to waste. If you bring extra scripts, just in case, you could potentially get way more videos… and they’ll all have a consistent look/feel which is a dream come true for any marketer.
- Create a time-lapse of the shoot – this footage can be incorporated with your studio footage to make the final video even more dynamic.
- Create short teasers – This can be done during post-production as well but filming shorter versions of the video could help give you rich content to use on social media and could also help drive traffic to the final video.
- Schedule a longer day – if you’re planning on renting a studio for half a day, think about extending that to a full day so you can get even more content that has a consistent look/feel. It’ll cost you more in the end to do two separate half-day shoots than it will to do one full day.
- Socialize the shoot – being on-set all day is really fun, share pictures or other posts on social media to start creating buzz around your new video. To get even more buzz, try to get the social media handles for all actors and the studio to reach their followers as well.
- Use a teleprompter – it might cost more to rent a teleprompter/operator if it doesn’t come with the studio rental but the time savings could be through the roof. This is extremely important to do especially if the actors are employees who aren’t used to reading scripts in front of a camera. A teleprompter will allow things to move much quicker during the shoot.
- Talk to the editor – If the studio is handling post-production of the video(s), try to connect with the editor and ask them to keep an eye out for ways to cut the video that will help provide a higher quantity of videos.
If you book a video studio rental for a whole day for $800 and produce one video, then the cost of the video is $800 (plus anything else that went into it). However, if you rent a studio for a whole day for $800 and produce four videos, the cost of each video is only $200 (plus anything else that went into it). This kind of mentality is very helpful to remember when shooting in a rented studio.
Hopefully you’ve found a few ways to get the most out of your video studio rental time. If you have any other ideas you’d like to share with us and our readers, please let us know in the comments section. Want to check out a studio in-person? Our very own SparkStudio is located in Austin, TX and we love visitors. Feel free to stop by and check it out anytime!
5 Ways to Crowdfund Your Idea like a Badass
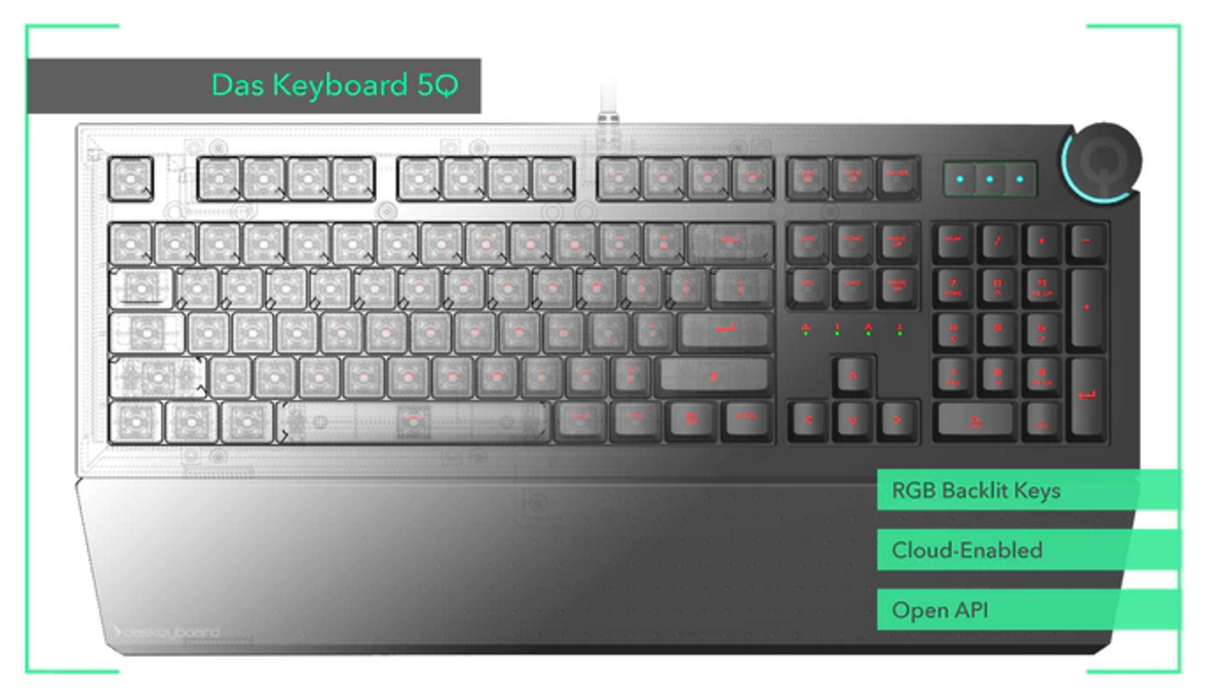
A Kickstarter Case Study with Das Keyboard
A decade ago, Das Keyboard made a big splash in their industry when they released a completely blank keyboard, which was an instant hit with the ‘übergeeks.’ So they have some experience with ideas that catch fire, and have built quite a fan base. But their latest project, a cloud-controlled keyboard called the Das Keyboard 5Q, was a big idea that went beyond what the company could develop in-house.
So, as many companies with big ideas are increasingly considering, they turned to Kickstarter to see if their fan base was willing to help make their dream a reality.
In short, they were willing.

Das Keyboard raised almost six times their goal, exceeding their initial target of $100,000 in 7 hours, and ending with a grand total of $580,902 from 3,475 backers. For a company that prides themselves in being badass, their Kickstarter lived up to their brand. Here are five ways you can crowdfund like a badass.
1. Make Sure it’s Good
Let’s get the obvious out of the way first: you need an idea people will think is worth funding. But what makes the product right for crowdfunding, and how do you prove it?
If you try to launch a campaign with a completely untested concept, the funding will likely fall short. And if your product seems like something that could just as easily be funded in-house, people are going to be far less willing to pledge. So the ideal crowdfunded product should aim for the sweet spot between market-proven and ground-breaking.
But they are still a small, privately-owned company, which meant their vision of mass producing a cloud-controlled keyboard would require external funding.
DasKeyboard created early prototypes of both the software and hardware components of the keyboard before making an ask for public financing. This initial, smaller investment in a proof-of-concept paid off because it strengthened the product and their messaging before they brought it to Kickstarter.
This doesn’t mean you need a fully-functional prototype to test an idea’s viability, but it does mean you need something to prove to yourself, your company, and your potential backers that the idea has legs. This is why Kickstarter encourages showing prototypes, even if they are incomplete. Financial backing is more likely if you can show that you are serious about the concept and have already moved beyond sketches on the whiteboard.
2. Make Marketing Content
Every crowdfunding effort needs a campaign video. It’s the simplest way to make your pitch, and is the most shareable on social. It also allows you to introduce and control the tone that your campaign, brand, and product will have.
You can go with any range of styles, from handheld smartphone video to fully-produced commercial. The style you choose really depends on who you are and what you’re asking for: If you’re an indie screenwriter with $0 in the bank, it makes sense to shoot an elevator pitch on your phone and get it online. If, however, you’re an established company hoping to fund a new product, your customers/backers might expect a bit more of an investment in your pitch video.
This can present a challenge because you are effectively making a product video for a product that does not yet exist.
One simple, low-cost crowdfund method, which many companies have used successfully, is to interview the founders talking about their company, their vision for the project, and why the audience should care about it. This is a great way to sell the idea, especially when you don’t yet have a tangible product to show. The downside is it focuses on the people, not the product. And when you’re asking for funding, especially a lot of it, showing is better than telling.
Because Das Keyboard already had a semi-functional prototype, we at Sparksight were able to combine live action b-roll with narration and animation to give a sense of what the keyboard will be capable of. We could have done the entire video with talking heads explaining these features, but found that the keyboard’s functionality and what this meant for the future of keyboards was too much to just be ‘talked about.’ We needed to show not only how the keyboard would behave but specific use cases that would get backers’ minds racing about what other capabilities there might be. The result was this video, which headlined Das Keyboard’s campaign:
So once you’ve got a pitch video, you’re done, right?
Nope.
A solid campaign doesn’t just stop creating content after the video is ready. It adds credibility to your campaign to create additional content that goes on the campaign page and as well as content that can be posted on social throughout the campaign. This could be CAD drawings or sketches, previews of new design features, or data charts that help make the pitch for why people should support you.
We worked with Das Keyboard to design graphics for the main campaign page that visually complimented the campaign video.
Das Keyboard also used clips and even created animated GIFs from their pitch video content to post to social. This extra content helps keep the campaign fresh with both backers and potential backers, which leads us to one of the most important things you can do to have a successful campaign…
3. Plan Ahead
A crowdfunding campaign is like a marketing campaign, but tougher because you’re marketing a product that does not yet exist. And just like you wouldn’t launch a marketing campaign without a plan, you should not start your Kickstarter without having a clear plan for how you will run it.
Das Keyboard’s campaign didn’t get funded in 7 hours by accident. A good crowdfunding campaign starts months before the launch date. As you determine what content in addition to a pitch video you will want to have, you need to allot when and where that content will be released. Again, some of it may go on the main campaign page, but a lot of what you prepare is for weeks 2 and 3, when you might experience a lull in funding.
Once someone is backing you, they are more likely to keep an eye on your social platforms for updates (which we’ll get to in a minute). But that means part of your audience doesn’t want to see only requests for more backers.
You can plan for this expanded audience of advocates by lining up relevant content that isn’t directly tied to your campaign in advance. If you know that a large portion of your backers are gamers (as Das Keyboard does), you may want to set up alerts for gamer news, or follow big gaming Twitter accounts in case something interesting comes through that you could relate to your industry as well.
Additionally, you can pre-source humorous gifs, vines, or graphics that you can tweet throughout the campaign, so you aren’t scrambling to find that perfect reaction gif when your goal is reached.
Planning to crowdfund just as you would a product roll-out will sufficiently prepare you for the day-to-day of the campaign, but there is one other way you need to plan ahead that is very specific to crowdfunding: Rewards.
You have to strategize what you will offer, to whom, and for how much. A big mistake of campaigns is to offer superfluous tangible rewards, like T-shirts, without appropriately considering the costs to design, print, package, and ship them. Keep the tangible extras to a minimum, and instead focus on valuable upgrades backers can get by spending just a little more.
Das Keyboard’s higher level pledgers were offered early access to the development kit, so they could start tinkering with the software and customize it before anyone else. This is an ideal type of upgrade: intangible, but valuable for funders.
4. Engage Your Community
The core of a strong crowdfunding campaign is engaging your community. This means watching social, reading comments, answering questions, and updating backers. These earliest adopters to your product rightly feel they deserve to be kept up to date.
This doesn’t mean telling your backers every time you get a new pledge, but it does mean keeping them updated when you make a reach larger goals, make changes to the design, or add features that might appeal to them.
Das Keyboard leveraged their community with a survey that helped determine what foreign language keys should be developed, which both reinvigorates backers and also gives them a voice in how the product takes shape. And this is probably the most important thing to take away when it comes to crowdfunding a project…
5. Be Flexible
To crowdfund is basically to conduct Crowd R&D. Backers are pledging their support not only because they believe in you and/or your product, but because they want to be part of the process. This means simply updating them on changes you make isn’t enough… you need to be willing to make changes based on what your backers want to see.
So don’t just engage your community, listen to them. Otherwise you’re not crowdfunding, you’re just offering pre-orders. Letting the community tell you what they want is the ideal scenario: you have the Demand asking for a very specific Supply, and they’ve already put their money down. So the more you can listen, the better
This doesn’t mean that you should be so flexible that your campaign to create a USB-powered coffee pot should become a USB-powered self-driving car… but it does mean you need to know where you have flexibility and encourage input from your backers to make the best product you can for the people who’ve already purchased it. If your manufacturing process will be too rigid to accommodate some of the most popular requests from customers, than you may need to consider an alternative to crowdfunding.
Das Keyboard built a few of their customer-requested hardware upgrades into their campaign. The first, an aluminum panel, was announced after being their most-requested upgrade. They went on to offer a “mystery upgrade” that would only be released if they achieved their stretch goal of $500,000. This upgrade was based on feedback and requests they received from their backers, so it was a great added value to the people who had already backed the project, especially if the mystery of the upgrade enticed them to socialize the campaign and generate moreIn reality, they probably decided to make this upgrade as soon as they saw it was a popular request, but building it into their stretch goal campaign was a nice way to roll out an upgrade that the majority of their backers had asked for, and showed that they were willing to listen.
Come up with a good idea, prove it’s good with good content and a good plan, ask for feedback from your backers, and listen to what they say.
Do you have any other great tips for Kickstarters? Let us know in the comments below!
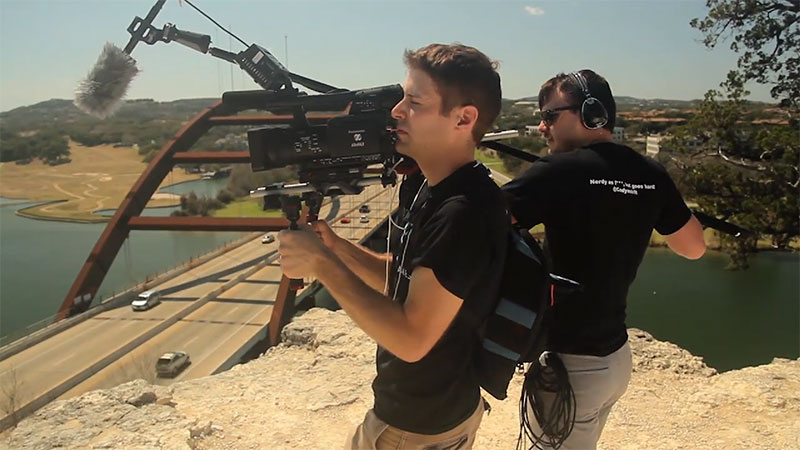
Haymaker Photo Behind the Scenes Video
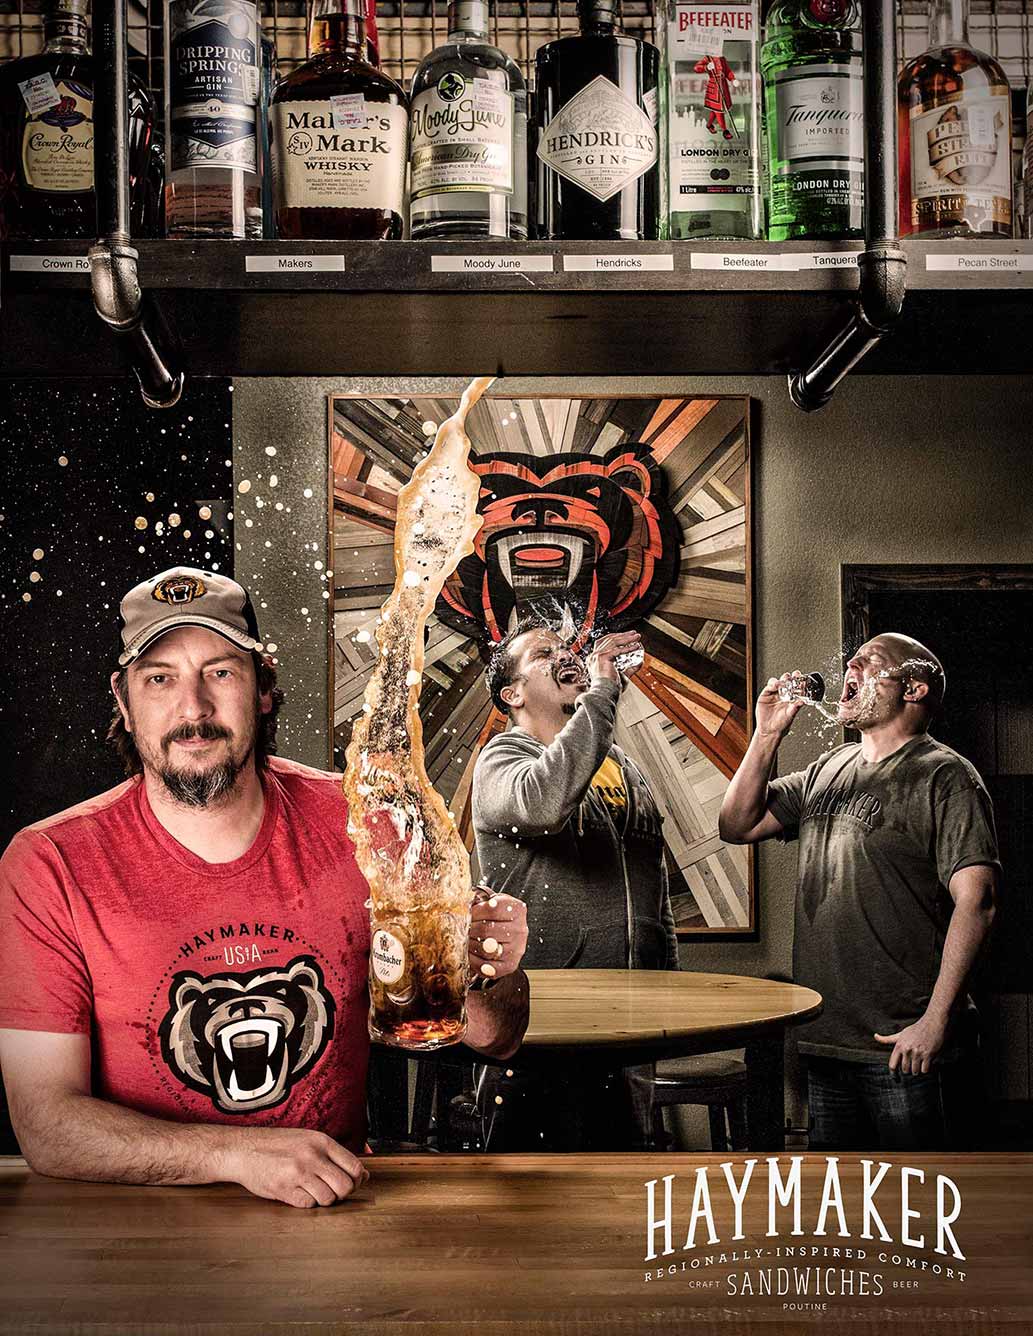
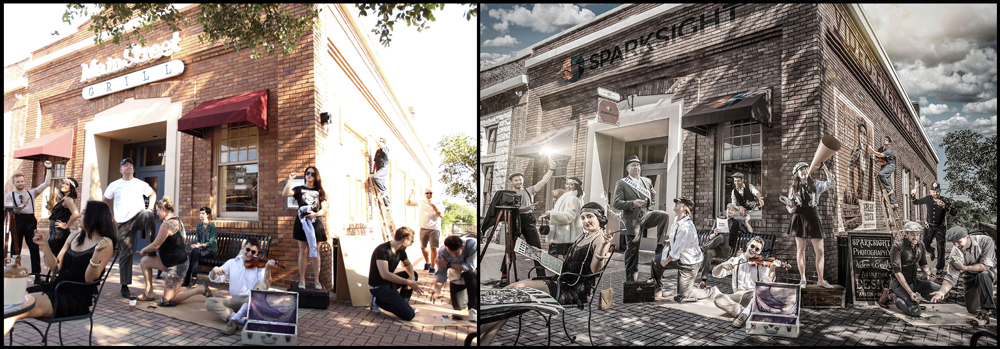
As an intern at Sparksight, the first project I was assigned was to create a behind the scenes video to take a look into the creative process of the Haymaker composite photo that was shot earlier this year. For those who don’t know, a composite photo is layering one moment, over another moment, as if they took place at the same time. For example, within any one frame of a photo, there are subjects in the foreground and the background that occupy space. The idea is the same for composite photos, except these subjects are broken up and their photos are taken at different times but, the illusion that they have their photos taken at the same time is what makes this different from a regular photo. This was the final product of the photo shoot:
The challenging part in creating a behind the scenes video, is going through hours of footage in search of the narrative these particular videos have. I went through the interviews, and found some moments that I thought would work. As we went through drafts of the piece, some moments just didn’t feel right anymore, so we searched for other parts that strengthened the overall narrative as well.
The trickiest part of any behind the scenes video or highlight reel is pacing the segments, and having a sense that this video is headed somewhere. For pacing, I’ve always considered music to be very important because there’s a tempo. As soon as that tempo is set from the beginning, we have an idea as an audience member what kind of ride we’re going on. Once our pace is set, a breakdown of what went into the piece needs to be established. So, I decided early on, I needed to introduce our three principle characters in the beginning in order for the audience to have idea that these people might show up again later on. George serves as the introductory interview in order to establish what this project was about, and how it was created on location at Haymaker. Drew serves as the post production guru, and Ricky’s objective opinion, in line with Drew’s closing statement, sums up what Sparksight was achieving with this piece.
As an intern, it’s interesting coming into a place where I can have creative freedom on a project and completely take it in the direction that fits within the overall aesthetic of Sparksight. At first, I was taken back a bit that I had that much freedom from the beginning, rather than trying to fit a mold. I appreciated that because I’m currently a film student at the University of Texas at Austin, and I’m constantly thinking about motifs, structure, style, narrative, etc. This piece allowed me to hone in on those skills, cut down on moments that didn’t need to be so prominent, and allowed our characters to shine. Take a look at the finished product!
5 Signs Your Company Meetings Should be Virtual
The purpose of holding internal company meetings is to keep teams or employees engaged, motivated, on track, and most of all, productive. At least once a year, once a quarter, or in some cases, once a month, companies gather into a conference room or rented event venue and tune in to executives discussing the company’s progress and roadmap for the future. However, in our modern “work from anywhere” global economy, there are some challenges with getting everyone in the same room, or even the same time zone for an in-person meeting.
Distributed workforces are starting to become the norm with organizations expanding across the U.S. and globally. So, does it make sense to fly out all of your employees to your company headquarters for internal meetings? Or, should you take your show on the road and travel to different company hubs around the globe to accommodate all of your employees? While both of those options should be considered, there is a third, more cost-effective and efficient option to consider: A virtual company meeting.
While this term “virtual company meeting” may conjure up images of avatars wandering around in Second Life, what I’m talking about is actually a bit more traditional. Widespread broadband and mobile broadband means that your team can attend your company’s meeting from almost anywhere. In fact, 32% of all meetings are now conducted virtually.
This article talks about the 5 signs your company meetings should be virtual, identifying the benefits of virtual communication along the way.
Is a significant percentage of your workforce remote?
According to the New York Times, “telecommuting has risen 79 percent between 2005 and 2012 and now makes up 2.6 percent of the American workforce, or 3.2 million workers”. If you account for that same rate of growth over the next 5 years, a significant number of companies will have a remote workforce in the near future. Keeping these employees engaged with your company and making them feel like a part of the team is essential. With employees engaging face-to-face through virtual meetings, they are able to foster a global team environment, a participating audience, free from other work related distractions, and a more progressive conversation.
Is your company cutting back on travel budgets?
Budget cuts are nothing new. Many companies are actively looking for ways to collaborate with prospects and customers without hopping on a transcontinental flight. The same ideas can be easily adapted for internal company meetings. The quality of an interaction between people many miles apart has increased significantly because of technologies like broadband, high definition video, screen sharing, and live interactive tools. If chosen wisely, the money spent on these technologies is a drop in the bucket compared to potential travel costs and loss of productivity when traveling. Virtual company meetings allow for big savings when it comes to travel costs.
Does your company have international employees?
According to LTS Training, “successful, high-performing international teams do not just happen. Working with people from other countries, often using different languages and working across different time zones, is a complex and often frustrating business – and these complexities need to be tackled right from the start.”
This is especially true when those people in other countries are part of the same company. Including them in a virtual event is a great way to bridge cultural gaps and help unite your organization as a whole.
Does your company embrace new technology?
Live streaming is a great way to make content more personal and humanize your business. If your company is one to embrace new technology trends, creating a virtual event may be a great way to demonstrate your culture of innovation to employees. Not only will prospects, clients, and employees be more engaged through live streaming, you can also see people’s expressions and body language, making for a stronger and more personable connection. Business2Community states that most employees and clients “like to do business with people they know, like, and trust, so the more content you can provide that shows your personality and the people behind the business, the better.” On top of this, live streaming also allows you to poll attendees and gather feedback from them in a simple manner instead of the chaos that comes with gathering feedback from attendees at or after a live event.
Do you want to provide an “on demand” version of your meeting after it’s over?
If you look at companies and organizations who are in the lead when it comes to big ideas, such as Gartner, TED Talks, and Singularity University, you will notice one thing they all have in common, rich libraries of video content. Think of your company meetings as an opportunity to begin building your own library for reference, communications and historical purposes. Enabling employees to view presentations on their schedule means higher participation rates at meetings and insight into your company’s vision.
So there you go, 5 triggers to indicate virtual company meetings are something your company should highly consider. If you are on the fence about changing your company’s meeting format, you can always continue meeting in person, but offering live or on-demand video recordings of those meetings after the fact is a great place to start. Ultimately, your employees and clients will appreciate the flexible, inclusive message you’re sending.
How to: Make Your Staff Photo the Bee’s Knees
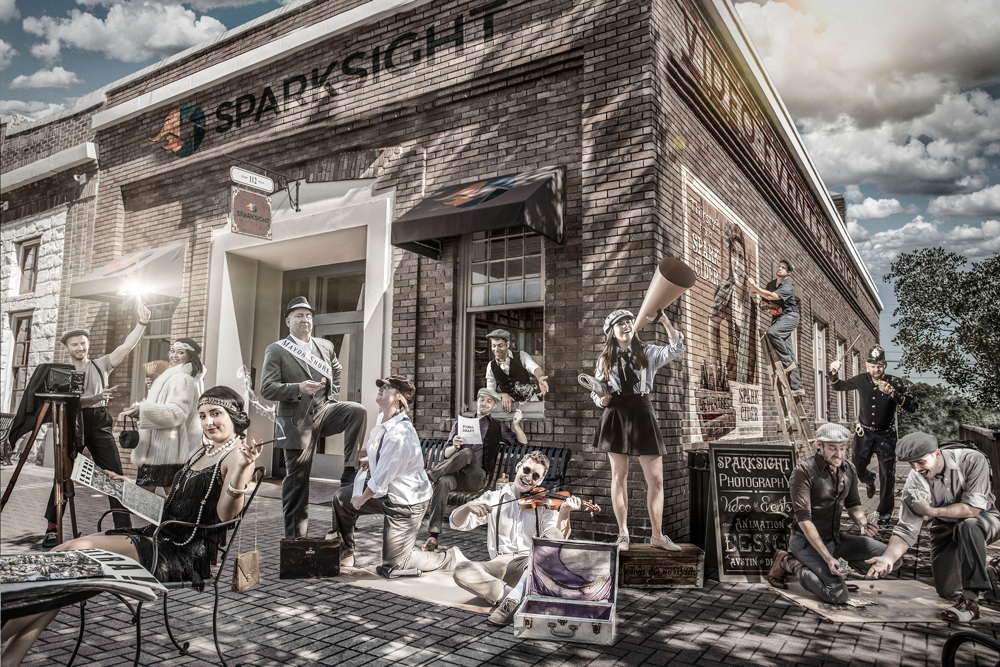
Here at Sparksight, taking the staff photo is something I look forward to every year. The staff photo is not only one of the more challenging projects to take on, it is also one of the most fun.
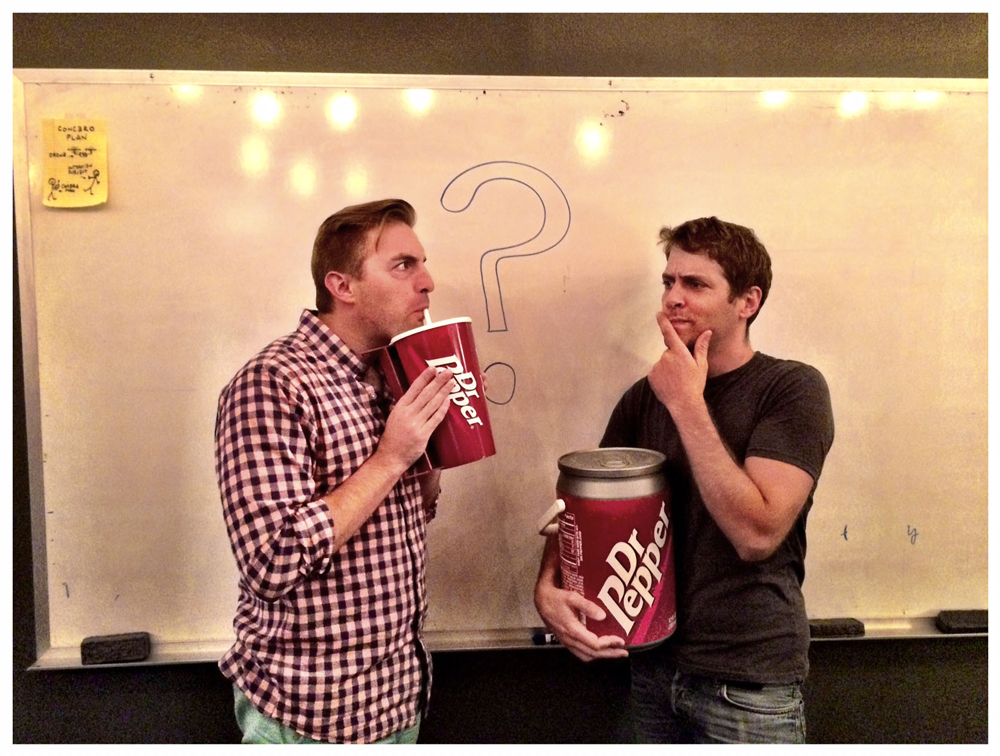
Fellow Sparksighter, Art Director, and all around cool guy, Andrew King and I decided to put our heads together to create a throwback photo of the Sparksight in the Roaring 20’s. It was a time when men wore slacks, hats were as common as socks, and women wore fur without feeling bad about it.
King and I brainstormed the general idea over Dr. Peppers before heading out on our location scout. Fun Fact: Not only does carbonated soda get the creative juices flowing, it was also the most popular drink in the 1920’s… according to King.
Once the general creative idea was agreed upon, it was time to get a wiggle on finding the perfect location to stage our shoot. So began our day-long location scout that took us from Austin, to Round Rock, and even all the way out to Taylor, TX. We were searching for somewhere quaint, old school… somewhere that would have been the cat’s meow back in the day.

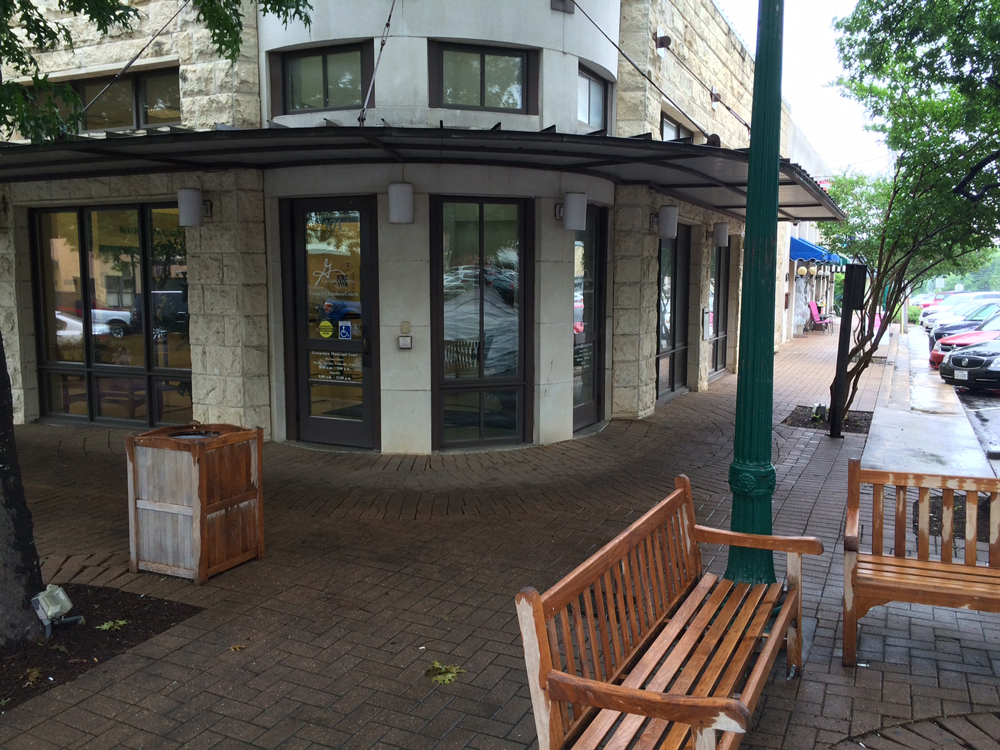
There were quite a few options to choose from but, due to production logistics, we chose one of the best joints in Round Rock, TX, Main Street Grill.
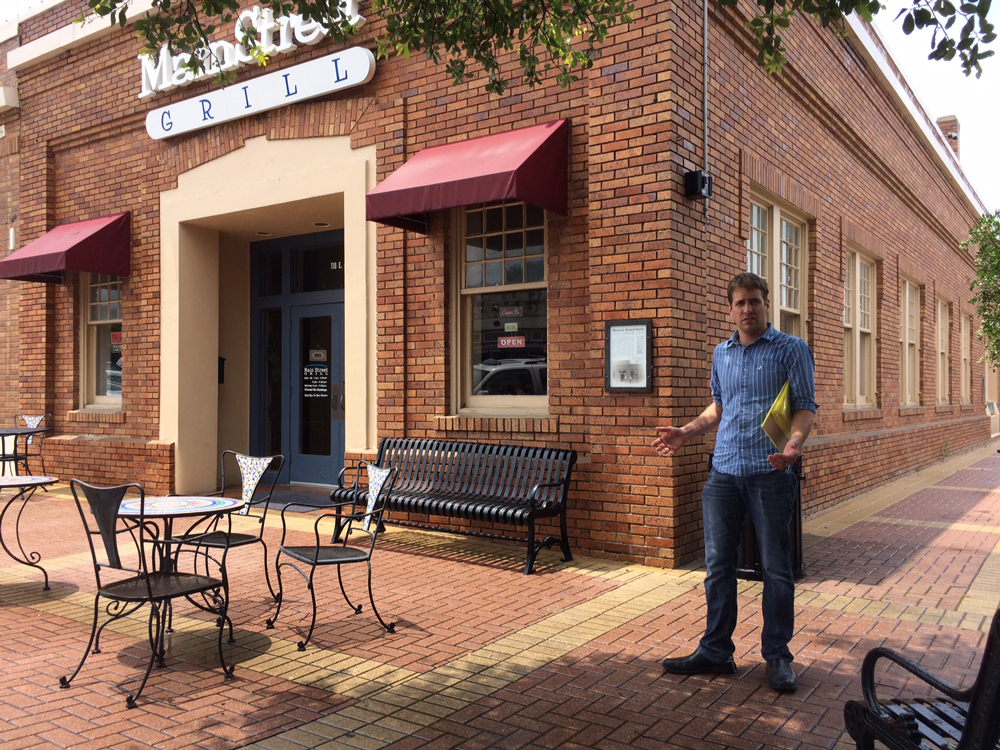
With the help of our hard boiled producer Ricky Holm, we received a blessing from the City of Round Rock to shoot that following Wednesday. Our plan was set in motion so, we began to block the scene. We sketched out what character each Sparksight guy or gal would get to portray and, where they would be placed in the photo.
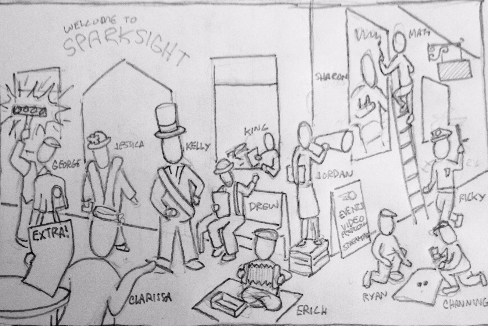
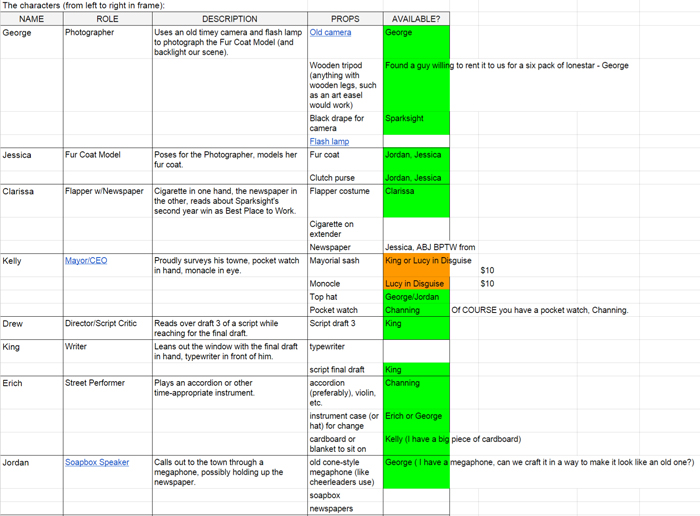
Once we had our vision locked in place, King began the hunt for props and costumes to get every Sparksighter dolled up. He shared a Google Spreadsheet with each Sparksighter’s role, character description, and needed props to see who had what available. Whatever props we didn’t have laying around in our studio or at home, King ventured out to make or purchase these items.
With glad rags in hand and all props secured, we were ready to invade Round Rock with our set dressing, lights, cameras, and nostalgic American spirit.
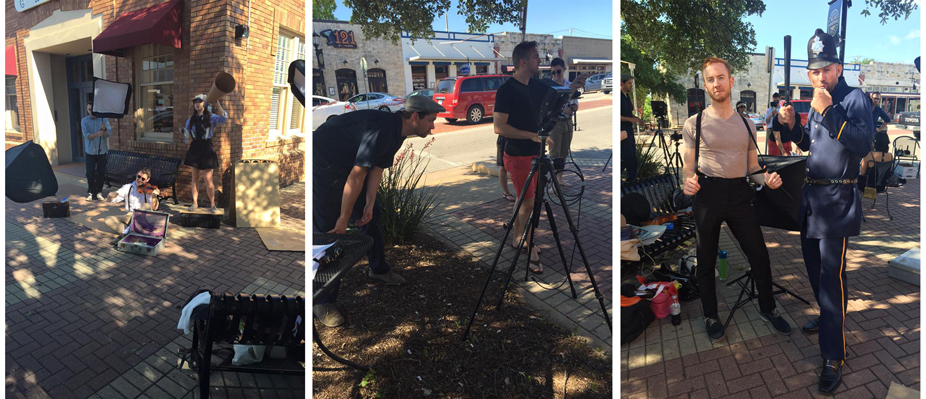
Everyone came ready to put on the Ritz. The entire shoot took less than 3 hours. We didn’t lollygag though, we wrapped by lunch and were back in the office editing by that afternoon. We all had such a swell time and the entire post process took about 10 hours to complete.
Here is a behind the scenes look at the rip-roaring time we had making our staff photo.
We also captured the whole post-production process for this composite staff photo and have sped it up if you’re interested in seeing each piece come together!